From our first Getting Started with Stata posts, you should be comfortable navigating the windows and menus of Stata. We can now get into programming in Stata with a do-file.
Why Do-Files?
A do-file is a Stata file that provides a list of commands to run. You can run an entire do-file at once, or you can highlight and run particular lines from the file.
If you set up your do-file correctly, you can just click “run” after opening it. The do-file will set you to the correct directory, open your dataset, do all analyses, and save any graphs or results you want saved.
I’ll start off by saying this: Any analysis you want to run in Stata can be run without a do-file, just using menus and individual commands in the command window. But you still should make a do-file for the following reason:
Reproducibility
Imagine you run all your analysis and get some interesting results you want to share with another researcher. If you used a do-file for your analysis, you can send over that file, send over the dataset, and tell the other researcher to run the file.
They will see exactly the same output as you got! Any edits to the dataset will be performed, all graphs and tests will be shown, and they can see all the results you see without having to type anything of their own.
If you didn’t have a do-file, you’d have no choice but to guide them through all the commands you performed one by one, opening up the possibility for a mistake.
Once you’re familiar with using Stata syntax, it will be much faster to do analysis through code than through the menus.
Your First Do-File
Now that you’ve been convinced on why they’re worthwhile, let’s look into how we use them! If you have a do-file saved on your computer, you can simply open the file to launch a new Stata window and an associated do-file editor.
If you need to make a new do-file, it can be done in several ways.
- You can click on the Window tab and then select Do-file Editor -> New Do-file Editor
- You can press ctrl + 9 (on windows)
- You can click on the pencil and paper icon 7 from the left of the icon bar
You should now have opened a do-file editor that looks like this
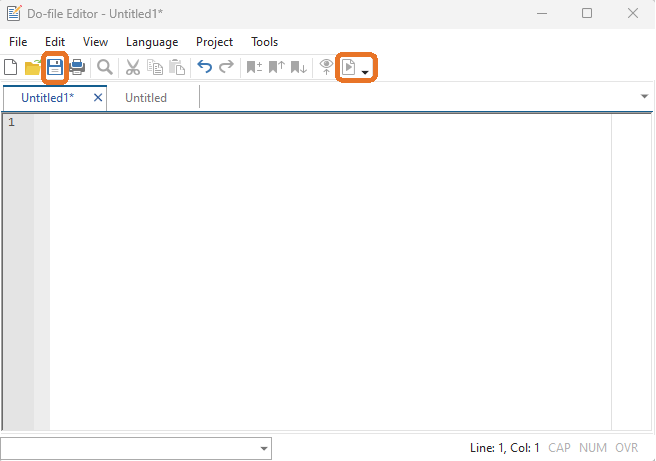
There is a large collection of options at the top, but we won’t need most of them for the basics.
For now, you can focus on making sure you know how to save your do-file, and how to execute it (the button that looks like an arrow on paper; all the way on the right).
That’s the Execute (do) button. We’ll use that in a minute.
Create good coding habits early
While our first example will be quite simple, it is important to get in good coding habits that will serve you well as things get more complex. At the start of every do-file you should have two things:
1. A command to change your directory:
Unless you got lucky, Stata is probably not using the right file location as its default. You will want some folder that will hold all your datasets and Stata files. You can set this by typing:
cd – followed by the directory you want to set, surrounded in quotation marks.
For me this looks like
cd "C:\Users\james\OneDrive\Documents\Analysis Factor\Stata blog post datasets"
2. A command to start a log of your syntax:
It is always good to have a log of your commands. This can be helpful in case Stata or your computer crashes before you’ve saved your do-file. The log gets saved after each command is run.
Use the code: log using “directory\filename.smcl”, replace
For me this looks like:
log using "C:\Users\james\OneDrive\Documents\Analysis Factor\Stata blog post datasets\log1.smcl", replace
The replace option makes it so Stata knows we are okay with deleting the old log when we make a new one.
If you’re certain your analysis will be quick and easy, you can usually skip the step of making a log, but remember that it is considered best-practices.
Making Code with Do Files
Soon we will learn about importing data from the directory, but since we’re just learning about do-files for now, let’s keep it simple.
Type the following into your third through 6th lines:
sysuse auto,clear
rename mpg mileage
describe
log close
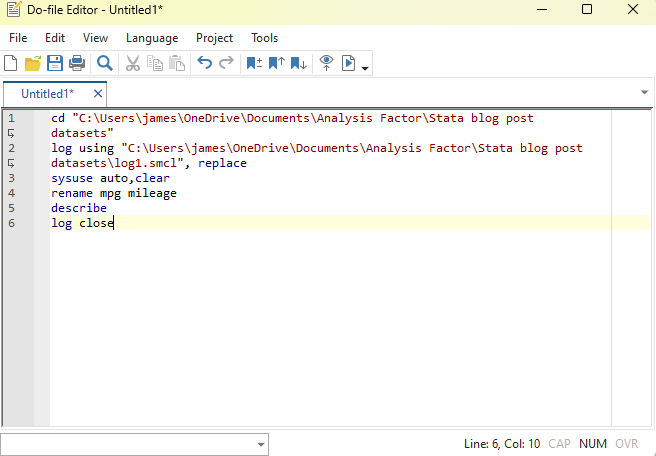
Your do-file should look something like this, and note how when code wraps to the next line, Stata does not use a new line number.
To get a picture of how Stata executes do-files, do the following:
- Highlight the third line of code, click on the “Execute selection (do)” button
- Highlight the fifth line of code, click on the “Execute selection (do)” button
Now look back to the results window of Stata. Note how when you highlighted a line, Stata only runs that one line of the file.
Even though we have a command in the do file that changes the name of mpg to mileage, Stata didn’t execute it because we only highlighted lines before and after it.
Now to see the whole file run, remove any highlighting and press the “do” button.
Notice how each command was performed, one at a time, in the order of the file. Now when we see the mpg variable, it has the name mileage.
You now have what it takes to make and use your own do-files.
by James Harrod
About the Author: James Harrod interned at The Analysis Factor in the summer of 2023. He plans to continue into a career as an actuary, and hopes to continue finding interesting ways of educating people about statistics. James is well-versed in R and Stata programming and enjoys teaching the intuition behind common statistical methods. James is a 2023 graduate of the University of Rochester with bachelor’s degrees in Statistics and Economics.

Leave a Reply