• Skip to primary navigation
  • Skip to main content
  • Skip to primary sidebar
The Analysis Factor

The Analysis Factor

Statistical Consulting, Resources, and Statistics Workshops for Researchers

  • Home
  • Our Programs
    • Membership
    • Online Workshops
    • Free Webinars
    • Consulting Services
  • About
    • Our Team
    • Our Core Values
    • Our Privacy Policy
    • Employment
    • Collaborate with Us
  • Statistical Resources
  • Contact
  • Blog
  • Login

R Graphics: Plotting in Color with qplot Part 2

by guest contributer 1 Comment

by David Lillis, Ph.D.

In the last lesson, we saw how to use qplot to map symbol colour to a categorical variable. Now we see how to control symbol colours and create legend titles.

Copy in the same data set of the last lesson (a medical data set relating to patients in a randomised controlled trial):

M <- structure(list(PATIENT = structure(c(32L, 15L, 41L, 42L, 44L,
17L, 31L, 10L, 38L, 18L, 22L, 30L), .Label = c("Adrienne", "Alan",
"Andy", "Ann ", "Anne ", "Anton", "Audrey", "Ben", "Bernie",
"Beth", "Bob", "Bobby", "Bruce", "Charles", "Dave", "Dianne",
"Frida", "Guy", "Henry", "Hugh", "Ian", "Irina", "James", "Jim",
"Jo ", "John", "Jonah", "Joseph", "Lesley", "Liz", "Magnus",
"Mary", "Max", "Merril", "Mike", "Mikhail", "Nick", "Peter",
"Robert", "Robin", "Simon", "Steve", "Stuart", "Sue", "Telu"), class = "factor"),
GENDER = structure(c(1L, 2L, 2L, 2L, 1L, 1L, 2L, 1L, 2L,
2L, 1L, 1L), .Label = c("F", "M"), class = "factor"), TREATMENT = structure(c(1L,
2L, 3L, 1L, 1L, 2L, 1L, 3L, 1L, 3L, 2L, 3L), .Label = c("A",
"B", "C"), class = "factor"), AGE = structure(c(3L, 2L, 2L,
1L, 2L, 2L, 1L, 1L, 2L, 1L, 2L, 2L), .Label = c("E", "M",
"Y"), class = "factor"), WEIGHT_1 = c(79.2, 58.8, 72, 59.7,
79.6, 83.1, 68.7, 67.6, 79.1, 39.9, 64.7, 65.6), WEIGHT_2 = c(76.6,
59.3, 70.1, 57.3, 79.8, 82.3, 66.8, 67.4, 76.8, 41.4, 65.3,
63.2), HEIGHT = c(169L, 161L, 175L, 149L, 179L, 177L, 175L,
170L, 177L, 138L, 170L, 165L), SMOKE = structure(c(2L, 2L,
1L, 1L, 1L, 1L, 1L, 1L, 1L, 1L, 1L, 2L), .Label = c("N",
"Y"), class = "factor"), EXERCISE = c(TRUE, FALSE, FALSE,
FALSE, TRUE, FALSE, FALSE, TRUE, TRUE, FALSE, FALSE, TRUE
), RECOVER = c(1L, 0L, 1L, 1L, 1L, 0L, 1L, 1L, 1L, 1L, 0L,
1L)), .Names = c("PATIENT", "GENDER", "TREATMENT", "AGE",
"WEIGHT_1", "WEIGHT_2", "HEIGHT", "SMOKE", "EXERCISE", "RECOVER"
), class = "data.frame", row.names = c(1L, 4L, 5L, 13L, 15L,
17L, 22L, 29L, 33L, 41L, 42L, 43L))

M

    PATIENT GENDER TREATMENT AGE WEIGHT_1 WEIGHT_2 HEIGHT SMOKE EXERCISE RECOVER
1     Mary      F         A   Y     79.2     76.6    169     Y     TRUE       1
4     Dave      M         B   M     58.8     59.3    161     Y    FALSE       0
5    Simon      M         C   M     72.0     70.1    175     N    FALSE       1
13   Steve      M         A   E     59.7     57.3    149     N    FALSE       1
15     Sue      F         A   M     79.6     79.8    179     N     TRUE       1
17   Frida      F         B   M     83.1     82.3    177     N    FALSE       0
22  Magnus      M         A   E     68.7     66.8    175     N    FALSE       1
29    Beth      F         C   E     67.6     67.4    170     N     TRUE       1
33   Peter      M         A   M     79.1     76.8    177     N     TRUE       1
41     Guy      M         C   E     39.9     41.4    138     N    FALSE       1
42   Irina      F         B   M     64.7     65.3    170     N    FALSE       0
43     Liz      F         C   M     65.6     63.2    165     Y     TRUE       1

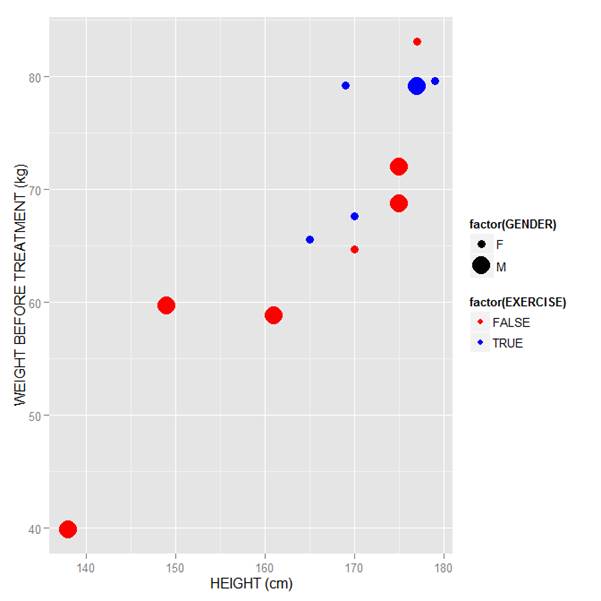
Now let’s map symbol size to GENDER and symbol colour to EXERCISE, but choosing our own colours. To control your symbol colours, use the layer: scale_colour_manual(values = ) and select your desired colours. We choose red and blue, and symbol sizes 3 and 7.

qplot(HEIGHT, WEIGHT_1, data = T, geom = c("point"), xlab = "HEIGHT (cm)", ylab = "WEIGHT BEFORE TREATMENT (kg)" , size = factor(GENDER), color = factor(EXERCISE)) + scale_size_manual(values = c(3, 7)) + scale_colour_manual(values = c("red", "blue"))

Here is our graph with red and blue points:

image001

Now let’s see how to control the legend title (the title that sits directly above the legend). For this example, we control the legend title through the name argument within the two functions scale_size_manual() and scale_colour_manual(). Enter this syntax in which we choose appropriate legend titles:

qplot(HEIGHT, WEIGHT_1, data = T, geom = c("point"), xlab = "HEIGHT (cm)", ylab = "WEIGHT BEFORE TREATMENT (kg)" , size = factor(GENDER), color = factor(EXERCISE)) + scale_size_manual(values = c(3, 7), name="Gender") + scale_colour_manual(values = c("red","blue"), name="Exercise")

image002

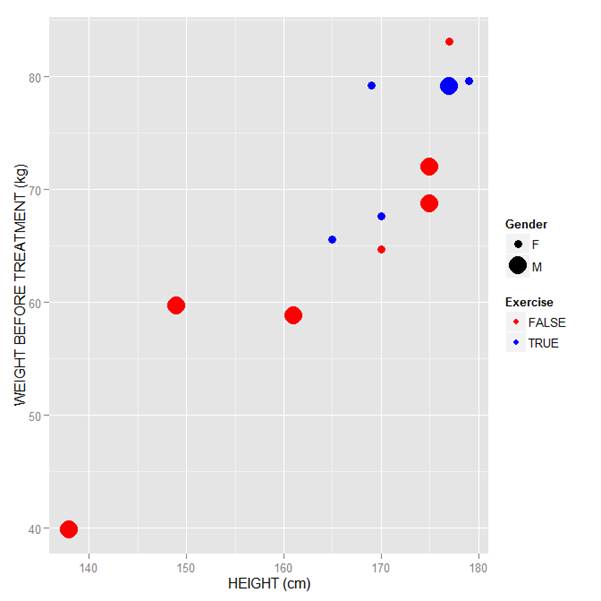
We now have our preferred symbol colour and size, and legend titles of our choosing.

See our full R Tutorial Series and other blog posts regarding R programming.


About the Author:
David Lillis has taught R to many researchers and statisticians. His company, Sigma Statistics and Research Limited, provides both on-line instruction and face-to-face workshops on R, and coding services in R. David holds a doctorate in applied statistics.

Bookmark and Share

Getting Started with R
Kim discusses the use of R statistical software for data manipulation, calculation, and graphical display.

Tagged With: colors, ggplot2, graph, plots, plotting, qplot, R

Related Posts

  • R Graphics: Plotting in Color with qplot
  • Doing Scatterplots in R
  • R is Not So Hard! A Tutorial, Part 22: Creating and Customizing Scatter Plots
  • Graphing Non-Linear Mathematical Expressions in R

Reader Interactions

Comments

  1. Jeff Bannon says

    January 21, 2015 at 12:04 pm

    The qplot statement has “data = T” when I think you mean “data = M”

    Reply

Leave a Reply Cancel reply

Your email address will not be published. Required fields are marked *

Please note that, due to the large number of comments submitted, any questions on problems related to a personal study/project will not be answered. We suggest joining Statistically Speaking, where you have access to a private forum and more resources 24/7.

Primary Sidebar

This Month’s Statistically Speaking Live Training

  • Member Training: Analyzing Pre-Post Data

Upcoming Free Webinars

Poisson and Negative Binomial Regression Models for Count Data

Upcoming Workshops

  • Analyzing Count Data: Poisson, Negative Binomial, and Other Essential Models (Jul 2022)
  • Introduction to Generalized Linear Mixed Models (Jul 2022)

Copyright © 2008–2022 The Analysis Factor, LLC. All rights reserved.
877-272-8096   Contact Us

The Analysis Factor uses cookies to ensure that we give you the best experience of our website. If you continue we assume that you consent to receive cookies on all websites from The Analysis Factor.
Continue Privacy Policy
Privacy & Cookies Policy

Privacy Overview

This website uses cookies to improve your experience while you navigate through the website. Out of these, the cookies that are categorized as necessary are stored on your browser as they are essential for the working of basic functionalities of the website. We also use third-party cookies that help us analyze and understand how you use this website. These cookies will be stored in your browser only with your consent. You also have the option to opt-out of these cookies. But opting out of some of these cookies may affect your browsing experience.
Necessary
Always Enabled
Necessary cookies are absolutely essential for the website to function properly. This category only includes cookies that ensures basic functionalities and security features of the website. These cookies do not store any personal information.
Non-necessary
Any cookies that may not be particularly necessary for the website to function and is used specifically to collect user personal data via analytics, ads, other embedded contents are termed as non-necessary cookies. It is mandatory to procure user consent prior to running these cookies on your website.
SAVE & ACCEPT